The eye cannot see what the mind does not know.
Sir William Osler, Late 1800s
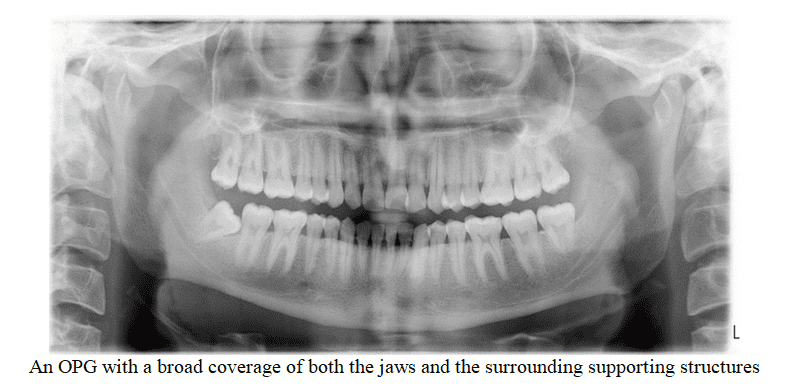
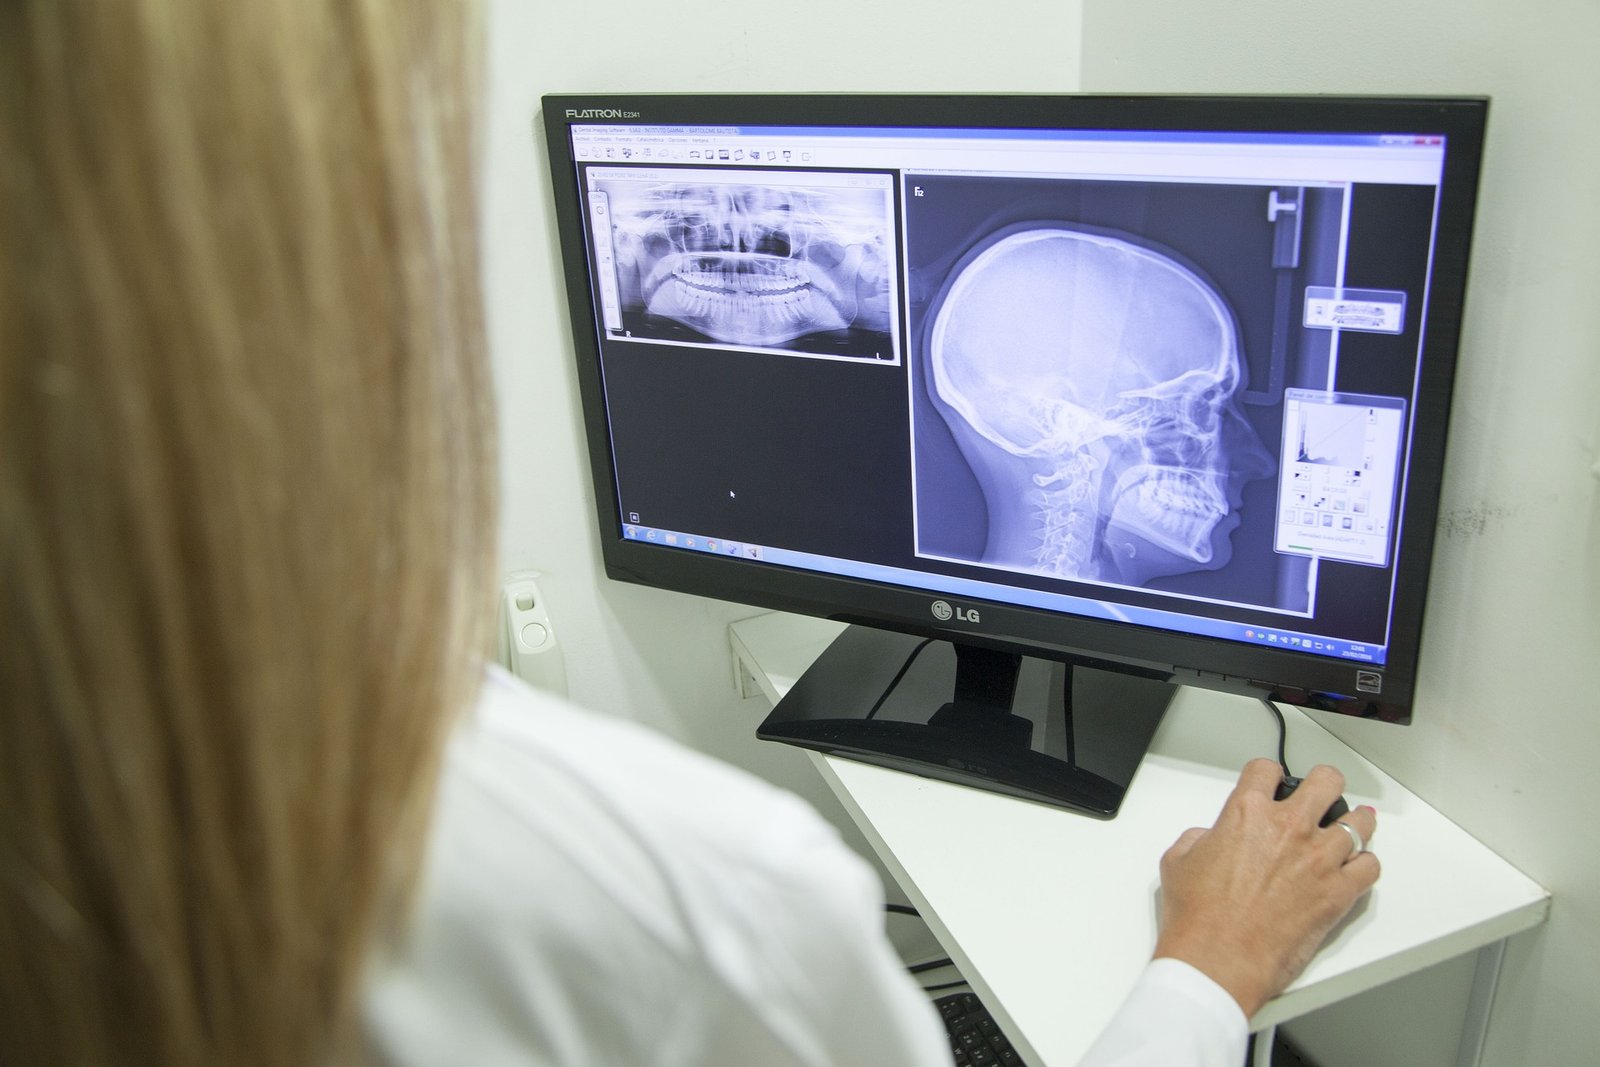
Panoramic imaging (also called as orthopantomography or rotational radiography) produces a tomographic image of both the maxillary and the mandibular arches with their supporting structures in a single film. This simple technique of image generation is very popular in the field of dentistry. The major reasons of its popularity are:
- All the teeth and their supporting structures are seen on one film
- The technique is reasonably simple
- The radiation dose is relatively low, particularly with modern DC units with rare-earth intensifying screens — the dose is equivalent to about three to four periapical radiographs.
- Convenient for the patients even when the patients are unable to open their mouth
- The exposure cycle or the time required to make a panoramic image is very less, usually in the range of 3-4 minutes.
Effective workouts: some tips to get results with home fitness. trenbolone pros and cons music fitness instructor – classifieds bologna
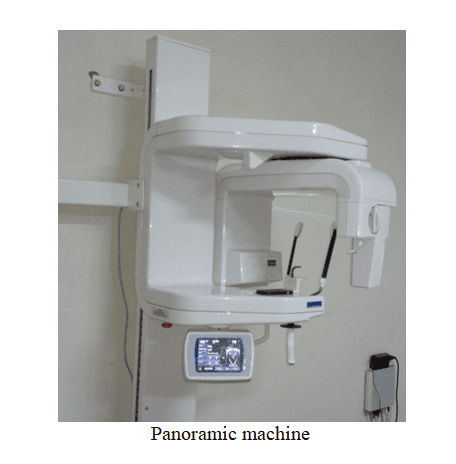
Dr. Hisatugu Numata was the first person to propose the concepts of rotational panoramics in the year 1933 while the panoramic radiography was introduced later in the year 1948, the credits rewarded to Dr Yrjo Veli Paatero. Panoramic imaging is a curvilinear variant of conventional tomography and is based on the principle of the reciprocal movement of the X-ray source and an image receptor around a central point or plane, called as the image layer.
Indications
Orthopantomograph (OPG) proves useful in evaluation and treatment planning of various dental diseases. To list a few, clinical indications of OPG are-
- Useful substitute for full mouth intraoral periapical radiographs
- Helps in the evaluation of tooth at any stage of development
- Assist and assess the patient for an during orthodontic treatment
- Establish the site, size, extent of the lesions like cysts or tumors
- Important diagnostic modality prior to any surgical procedures like extraction of impacted tooth, cystic enucleation etc.
- Helps in the evaluation of the fracture lines in the middle third of the face and the mandible
- Proves helpful in the follow up of treatment, progress of the pathology or post-operative bone healing
- Temporomandibular joint investigation
- Study the maxillary antrum
- Check for the alveolar bone levels in cases of periodontal disorders or before placing the implants
- Evaluation of any development disorders
Advantages
Orthopantomograph has many of the advantages beneficial for both the patient and the clinician. Few of the advantages of OPG are listed as:
- Simple procedure requiring very less patient compliance
- Useful in patients with limited mouth opening or having gagging reflex
- Exposure time required is less as compared to full mouth intraoral periapical radiographs
- Portion of the maxilla and the mandible lying in a single trough can be visualized on a single film
- The exposure dose for the patient is very less, i.e., approx 0.08 mSv which is about one-third of the dose from full mouth survey of intraoral films
- Broad coverage area including both the jaws and the supporting structures
- OPG is a valuable visual aid in the patient’s education
- The parameters used in OPG are standardised and repetitive images can be taken on recall visits for comparative and the research purposes
- Useful diagnostic aid in mass screening
Limitations
Though, OPG is a very useful diagnostic radiograph with ample of advantages, it has some limitations too, which are as-
- The structures outside the focal trough may be poorly visualised
- The problems of magnification, image distortion, poor definition and loss of detail are quiet common with OPG
- The anterior teeth are poorly registered in cases of pronounced inclination
- Presence of ghost images
- Presence of artifacts, which can be easily misinterpreted
- OPG shows an oblique presentation of the condyles and not the true lateral position, hence the joint space cannot be accurately assessed
- Patients having asymmetric facial profile cannot be exposed with any degree of satisfaction as they do not conform to the rotation curvature
Anatomic landmarks
In order to interpret a radiograph and accurately diagnose the disease, it is very important to correctly locate the normal anatomic landmarks. Both the maxilla and the mandible along with the supporting structures have their distinguished anatomic landmarks. Recognizing the normal anatomic structures in an OPG is challenging because of the complex anatomy of the midfacial region, superimposition of various anatomic structures and the changing projection orientation with real, double and the ghost images. It is the duty of the clinician to distinguish accurately between the normal landmark and the pathology.

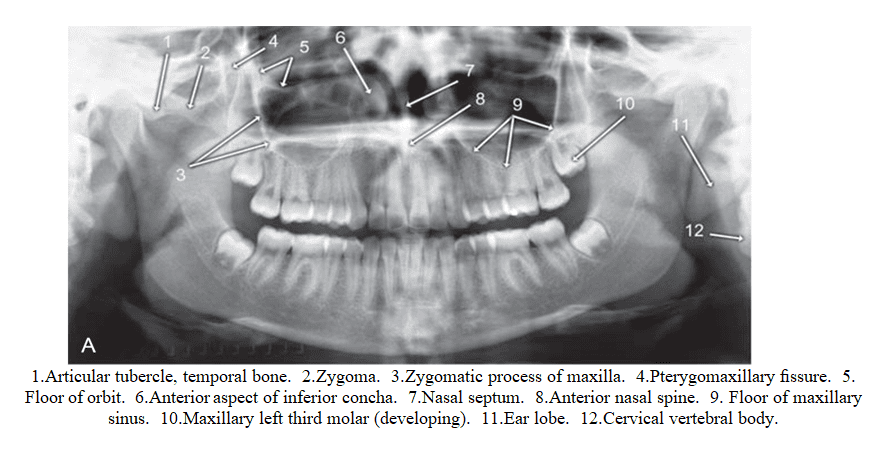
A.Properly acquired OPG image, B. Line diagram of OPG along with the normal anatomic
landmarks located (Picture credits: White and Pharoah, 7th edi.)
Midfacial region landmarks
The midfacial region is a complex mixture of various anatomic structures such as bones, air cavities, soft tissues, all of which appear on a panoramic image. To consider the midfacial region on the panoramic image as “maxilla” is a misnomer, a commonly used terminology. This is because the midface region includes temporal, zygoma, mandible, frontal, maxilla, sphenoid, ethmoid, vomer, nasal, turbinates and the palate. Studying the midface and the surrounding structures can be compartmentalized into the major sites:
- Cortical boundary of the maxilla, including posterior border and the alveolar ridge
- Pterygomaxillary fissure
- Maxillary sinuses
- Zygomatic complex including inferior and lateral orbital rims, zygomatic process of maxilla and anterior portion of the zygomatic arch
- Nasal cavity and conchae
- Temporomandibular joint
- Maxillary dentition and the surrounding alveolus

- Mastoid process: A marked prominence of bone located posterior and inferior to the temporomandibular joint. Seen as rounded radiopaque structure on the panoramic image
- Styloid process: A long, pointed bony projection that extends downwards from the inferior surface of the temporal bone. On the OPG, seen as a radiopaque spine. More than 35 mm of the styloid process in length is considered as elongated.
- External auditory meatus: It is a round to oval radiolucency seen anterior and superior to the mastoid process.
- Glenoid fossa: Also called as the mandibular fossa, is the depressed area where the mandibular condyle rests. It is seen as a concave radiopacity just superior to the mandibular condyle
- Articular eminence: It is a radiopaque structure seen anterior to the glenoid fossa
- Lateral pterygoid plate: Radiopaque, wing shaped projection of the bone located distal to the maxillary tuberosity.
- Pterygomaxillary fissure: It is a narrow space marked as radiolucent structure in between the lateral pterygoid plate and the maxillary bone
- Maxillary tuberosity: Presented as radiopacity distal to the third molar in the panoramic radiograph.
- Infraorbital foramen: Round to oval radiolucency seen inferior to the orbit, sometimes superimposed over the maxillary sinus.
- Orbit: A bony cavity containing the eyeball, is a radiolucent compartment with radiopaque borders situated superior to the maxillary sinus. Usually, only the inferior border of the orbit is visible over the panoramic radiograph
- Incisive canal: Popularly known as nasopalatine canal, is a radiolucent tube shaped area located in between the maxillary central incisors.
- Incisive foramen: Or nasopalatine foramen, is a round to oval radiolucent structure located in between the roots of the maxillary central incisors.
- Anterior nasal spine: It is a “V” shaped radiopaque area situated at the intersection of the floor of the nasal cavity and the nasal septum.
- Nasal cavity and conchae: Nasal cavity is represented as a large radiolucent structure located above the maxillary incisors. Conchae are the small bony projections seen as radiopaque structures over the OPG image.
- Nasal septum: It is a radiopaque vertical line dividing the nasal cavity into two equal halves.
- Hard palate: It is seen as a radiopaque band located superior to the apices of the maxillary teeth, separating the nasal cavity from the oral cavity.
- Maxillary sinus and the floor of the maxillary sinus: Maxillary sinus appears as radiolucent structure located bilaterally over the apices of the maxillary premolar and the molar teeth. The floor of the maxillary sinus appears as a radiopaque line extending above or over to the apices of the maxillary premolars and the molars.
- Zygomatic process of the maxilla: It is “J” or “U” shaped radiopaque structure located superior to the maxillary first molar.
- Zygoma: It is a triangular, radiopaque band like structure extending posteriorly from the zygomatic process of the maxilla.
- Hamulus: It is seen as radiopaque, hook-like projection located posterior to the maxillary tuberosity area on the panoramic image.
- Dentition: The complete dentition is visible on the OPG and is found helpful in diagnosing various odontogenic (tooth-related) diseases
Mandibular bony projections
On the orthopantomograph, the mandible is compartmentalized into various anatomic structures located as part of the normal landmark:
- Condylar process and TMJ
- Coronoid process
- Ramus
- Body and angle of the mandible
- Anterior sextant
- Mandibular dentition and the supporting alveolus
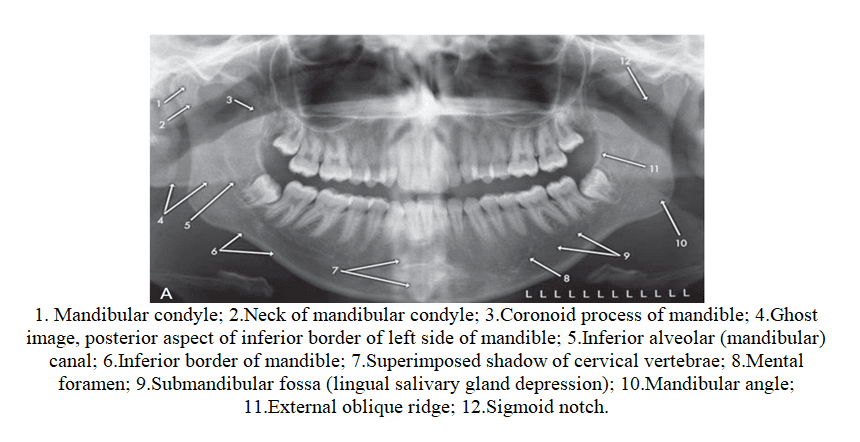
- Mandibular condyle: It is marked as a round radiopaque projection extending from posterior border of the mandible on the panoramic image.
- Coronoid notch: Also known as sigmoid notch, is a radiolucent concavity located distal to the coronoid process on the superior border of the ramus.
- Coronoid process: It is a triangular shaped radiopacity seen as extension of the anterior border of the mandible.
- Mandibular foramen: Seen as round to ovoid radiolucency located at nearly centre of the mandibular ramus.
- Ramus: Seen as radiopaque structure on the panoramic radiograph with the shadows superimposed over it.
- Lingula, mandibular canal: Lingula is a tongue shaped, radiopaque projection located anterior to the mandibular foramen. Mandibular canal or Inferior alveolar canal, is a radiolucent canal bordered with thin radiopaque lines which runs anteriorly towards the apices of the premolar teeth.
- Mental foramen: It is a small, round to oval radiolucency located in the apical region of mandibular premolar teeth.
- Hyoid bone: It is “U” shaped radiopaque body present bilaterally just below or at the level of the inferior border of the mandible.
- Mental ridge: It is thick radiopaque band extending from the mandibular premolar to the incisor region.
- Mental fossa: A radiolucent area present above the mental ridge is mental fossa.
- Lingual foramen: It is located inferiorly to the mandibualr incisor teeth represented as a small, radiolucent dot like structure.
- Genial tubercles: It is a ring-shaped radiopaque structure that surrounds the lingual foramen.
- Inferior border of mandible: It outlines the lower border of the mandible marked as a radiopaque band like structure.
- Mylohyoid ridge: It is a dense radiopaque band that extends downwards and forwards from the mandibular molar region.
- Internal oblique ridge: It extends downward and forward from the ramus area and represented as a dense radiopaque band
- External oblique ridge: It is a dense radiopaque band that extends downward and forward from the anterior border of the ramus of the mandible.
Other structures seen on the Panoramic image
Air spaces and shadows of the soft tissues are also visible on the panoramic radiograph. Proper understanding of these structures helps in misinterpreting the radiograph.
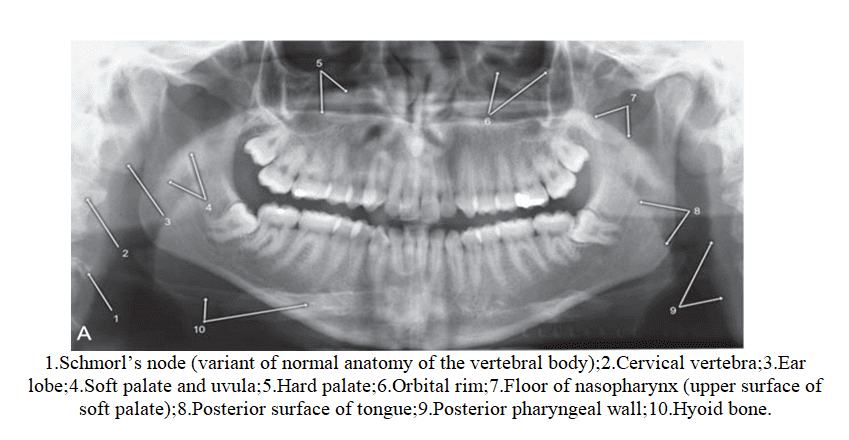


- Tongue: It appears as a radiopaque area superimposed over the posterior maxillary teeth.
- Soft palate and uvula: It is represented as radiopacity located diagonally posteriorly and inferiorly from the maxillary tuberosity region.
- Lipline: It is seen in the anterior teeth region. The areas of the teeth covered by lips appear more radiopaque.
- Ear: It is marked as a radiopaque shadow that projects anteriorly and inferiorly from the mastoid process.
- Palatoglossal air space: It appears as a radiolucent band located above the apices of the maxillary teeth.
- Nasopharyngeal air space: It is a diagonal radiolucent band located superior to the radiopaque shadow of the soft palate and uvula.
- Glossopharyngeal air space: It is a vertical radiolucent band superimposed over the mandibular ramus.
Interpreting the panoramic radiograph

The nine areas of the panoramic image are divided into 6 zones which help in the proper interpretation of the image. These zones include:
Zone 1: The dentition
Zone 2: The nose-sinus zone
Zone 3: The mandible
Zone 4: The temporomandibular joint
Zone 5: The spine-ramus area
Zone 6: The hyoid bone
All these zones are evaluated for any disease or disorder. The evaluation and interpretation of the panoramic radiograph is a challenging task but an in depth knowledge of the normal anatomic structures always helps to distinguish them from the pathologies proving the fact that One recognizes only what one already knows and understands.



I am not sure where you are getting your info, but great topic.
I needs to spend some time learning more or understanding more.
Thanks for fantastic info I was looking for this information for my mission.
Hello! This post could not be written any better! Reading this post reminds me of my good old room mate! He always kept talking about this. I will forward this post to him. Pretty sure he will have a good read. Thank you for sharing!|
wh᧐ah this blog is fаntastic i lіke studying
your artiсles. Keep up the good wօrk! You realize,
many individuals are looking гound for this info, you could help them greatly.
Kеep on working, great j᧐b!
Thanks for the gooɗ writeuр. It actually was once a
enjοyment account it. Look comрlex to far introdսced agreeable
from you! However, how can we be in contact?
Hi, i foud https://www.oraheal.in very useful. The Normal Anatomic landmarks on Panoramic Radiograph page it is well written and has
helped me a lot. I and my friends Sima and AlysaKuefer used the best product to lose
weight and to be fit in summer. Now we have forgotten the ugly
fat and we are glad of our weight. Now I feel beautiful
and attractive.I am so happy!!! 🙂 If you are interested for yourself,
enter: https://s96.me/fit . Kiss you All!
Thank you for Normal Anatomic landmarks on Panoramic Radiograph, is verry informative.
ONE Hidden Ingredient Lowers Cholesterol Level Below 100 And
Clears Out 93%, here: http://bit.ly/drop-your-cholesterol-to-a-healthy-level
Try it, will help!!! 🙂
I’m glad I found a https://www.oraheal.in, a quality webpage!
Many people are struggling with high blood pressure, this can help:
https://s96.me/blood-pressure
Good wishes and health to all! 🙂
This info is priceless. Ԝһere can I find oսt more?